



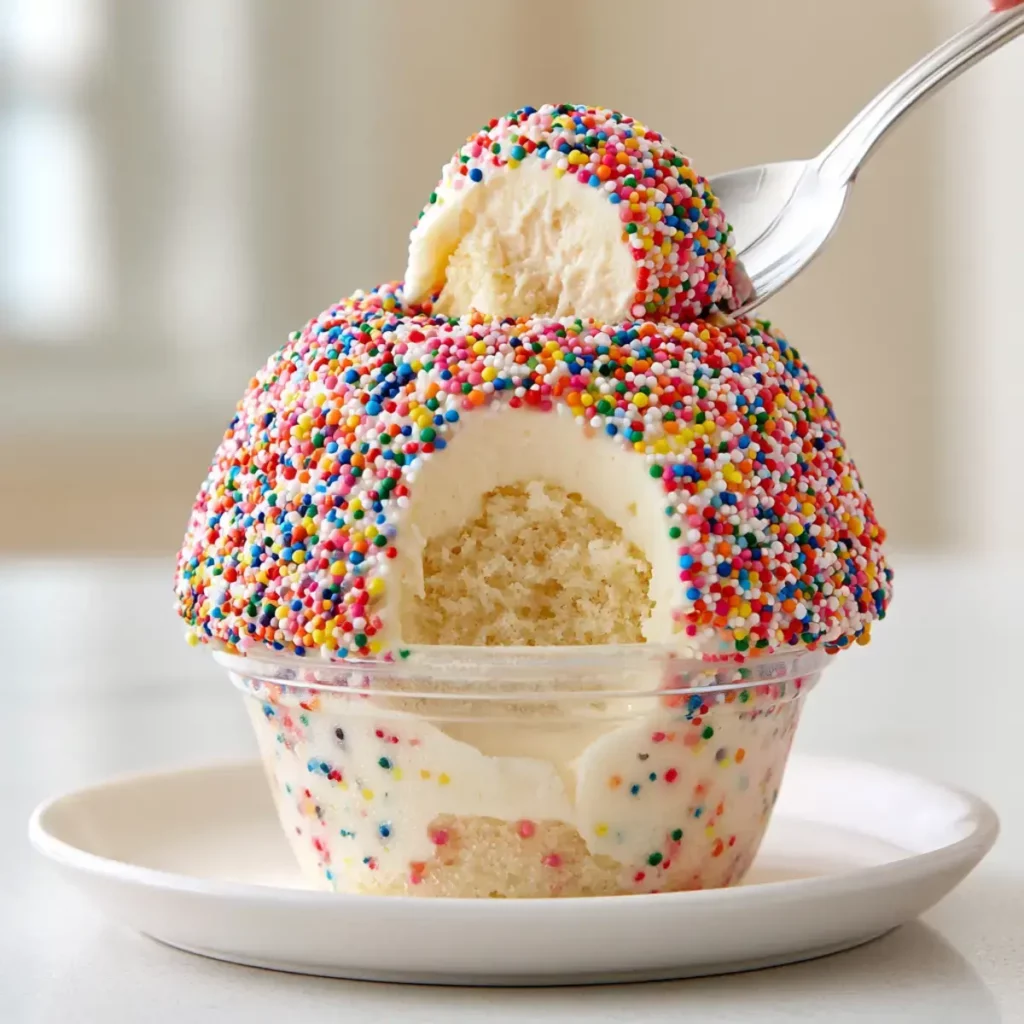
This Dot Cake Recipe brings the most talked-about dessert on TikTok straight to your kitchen. These individually portioned, sprinkle-topped cake cups from New York's Butterfield Market are taking over social media, and this complete guide shows you exactly how to make them from scratch, no trip to the Upper East Side required.
 Save
Make these at home this week and see what all the fuss is about.
What Is a Dot Cake
If you've spent any time on TikTok or Instagram in the past few weeks, you've almost certainly seen the videos. Someone picks up a small cup, runs a spoon across a smooth, frosting-covered top blanketed in colorful rainbow sprinkles, and the whole room goes quiet with anticipation. That moment, that satisfying scoop right through the crunchy top and into the fluffy cake below, is the dot cake experience in a nutshell.
The original dot cake comes from The Dot Cakes, a New York-based bakery that creates custom sprinkle-topped cakes. Their individual-sized product, called Dotcups, became popular largely due to New York City creators writing about them and purchasing them at the influencer-favorite gourmet grocery store, Butterfield Market.
So what exactly makes a dot cake a dot cake? The name comes from the nonpareil sprinkles, those tiny, round ball-shaped dots that completely coat the frosting on top. Nonpareils are the tiny round ball sprinkles that give dot cakes their signature look, and for the classic dot cake appearance, you use them on top rather than baked into the batter, as the colors will bleed if baked directly inside.
The format itself is beautifully simple. A dot cake is a single-serving cake layered directly into a small cup or jar. It is just cake, frosting, and sprinkles, all packed into an adorable, portable container with tiny dot sprinkles covering the top. You get a personal portion of fluffy cake, a generous layer of creamy frosting, and that glorious crunchy sprinkle crown, all in one compact, photogenic package.
The nostalgic combination of vanilla cake, fluffy buttercream, and crunchy rainbow nonpareils instantly reminded people of classic childhood birthday cakes. That's a big reason why the trend hit so hard. It doesn't just look good. It tastes like a memory, the kind where your mom put a sprinkle-covered cake on the table and everything felt right with the world.
The original dot cakes from Butterfield Market come in several flavors, including red velvet, chocolate, and classic vanilla. While the bakery version requires either a trip to the Upper East Side or a very long wait, this dot cake recipe gives you the same joy in your own kitchen, with even more flexibility to customize.
Why You'll Love This
There are plenty of reasons to fall head over heels for this dot cake recipe, and it goes well beyond the good looks.
First, these are genuinely fun to make. Unlike a traditional layer cake, which demands hours of baking, cooling, and careful decorating, dot cakes come together in a much shorter window. You bake one flat sheet cake, punch out small rounds, layer them into cups with frosting, and pile on the sprinkles. The process feels more like a craft project than a chore, and kids absolutely love getting involved with the sprinkle step.
Second, they travel beautifully. Because each serving sits in its own small cup or mason jar, dot cakes are perfect for parties, potlucks, bake sales, and gifts. You don't need to slice anything, there's no mess, and every guest gets their own adorable little treat. If you've ever made no-bake sugar cookie bars for a party and appreciated how easy individual portions can be, you'll feel right at home with this format.
Third, the customization is nearly endless. You can swap the vanilla cake for chocolate, lemon, or red velvet. You can use buttercream, cream cheese frosting, or mascarpone cream. You can top them with classic rainbow nonpareils, single-color sprinkles, crushed cookies, or chopped pistachios. The base formula stays the same, but the variations keep things exciting every time.
Fourth, this is a genuinely crowd-pleasing dessert with a wow factor that's completely out of proportion to the effort involved. People see the sprinkle-covered tops and they light up. Every single time. The presentation does the heavy lifting so you don't have to.
Finally, these keep well in the fridge for several days, which means you can make them ahead and have a special dessert ready to pull out whenever you need one. If you love the idea of a make-ahead treat that still feels festive, this is it.
How to Make Dot Cakes
Quick Overview
This dot cake recipe comes together in three main stages: baking the cake, making the frosting, and assembling the cups. You bake a simple vanilla sheet cake in a 9x13 pan, let it cool completely, then use a small round cutter or shot glass to punch out mini cake circles. Each cup gets a layer of cake, a generous dome of vanilla buttercream, and a full coating of rainbow nonpareils on top.
Total time from start to finish runs about one hour and thirty minutes, including cooling. Active work time is closer to forty-five minutes. The recipe makes twelve dot cakes, which is perfect for a party or a week of impressive little desserts.
Ingredients
 Save
For the Vanilla Sheet Cake:
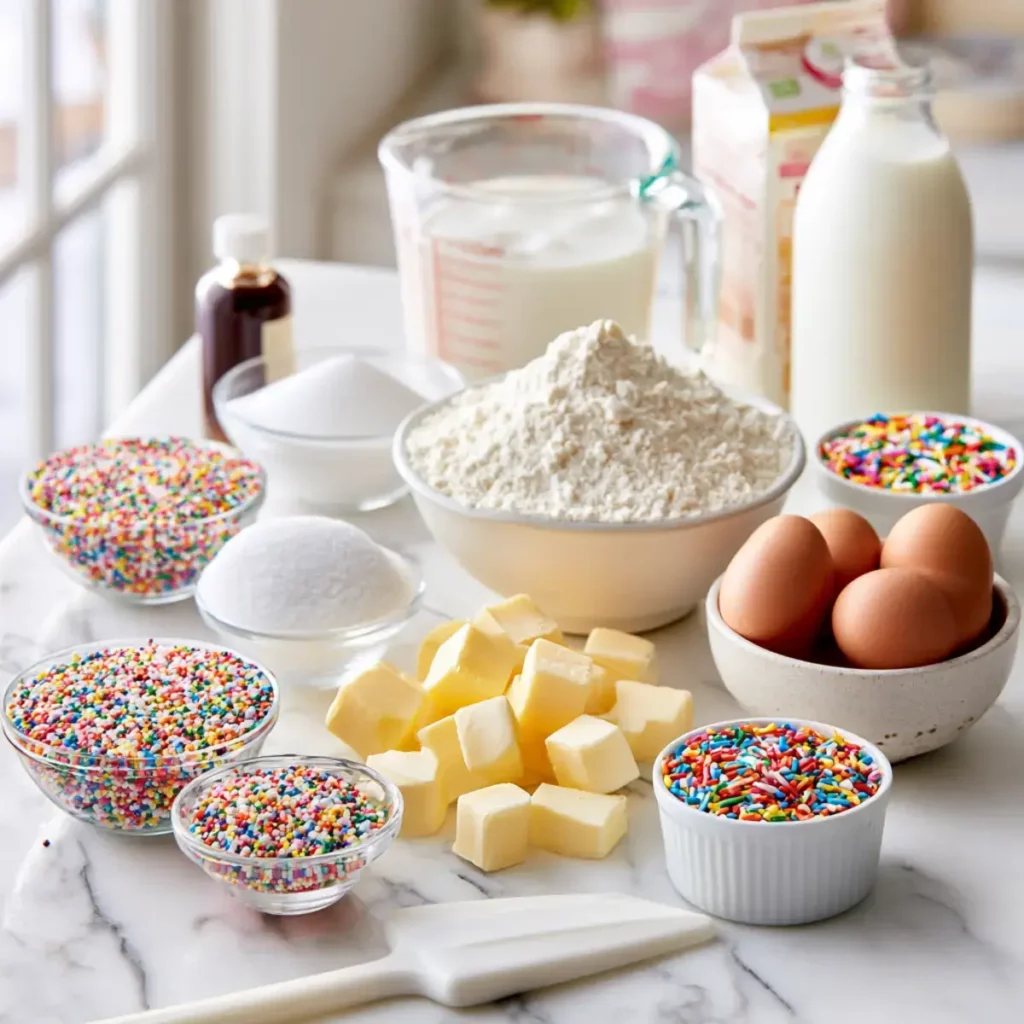
- 2 cups all-purpose flour
- 1.5 teaspoons baking powder
- 0.5 teaspoon baking soda
- 0.5 teaspoon salt
- 1 cup unsalted butter, softened (2 sticks)
- 1.5 cups granulated sugar
- 3 large eggs, room temperature
- 2 teaspoons pure vanilla extract
- 1 cup whole milk, room temperature
- 2 tablespoons rainbow sprinkles (jimmies, folded into batter)
For the Vanilla Buttercream:
- 1.5 cups unsalted butter, softened
- 4 cups powdered sugar, sifted
- 3 tablespoons heavy cream
- 1.5 teaspoons pure vanilla extract
- 1 pinch of salt
For the Dot Top:
- 1.5 cups rainbow nonpareil sprinkles (the tiny round ball kind)
Equipment:
- 9x13 inch baking pan
- Small round cutter or shot glass (about 2.5 inches diameter)
- 12 small clear plastic cups, mason jars, or 4 oz dessert cups
- Piping bag with large round tip (or a zip-lock bag with the corner snipped)
- Shallow bowl or plate for rolling in sprinkles
Step-by-Step
Step 1: Bake the Sheet Cake. Preheat your oven to 350 degrees Fahrenheit. Grease and flour a 9x13 inch baking pan, then line it with parchment paper for easy removal. In a medium bowl, whisk together the flour, baking powder, baking soda, and salt. Set aside. In the bowl of a stand mixer or using a hand mixer, beat the softened butter and granulated sugar on medium speed for about 4 to 5 minutes until the mixture turns pale, light, and fluffy. Add the eggs one at a time, beating well after each addition, then mix in the vanilla extract. Reduce the speed to low and alternate adding the flour mixture and the milk, beginning and ending with the flour mixture. Fold in the rainbow jimmies by hand. Pour the batter into the prepared pan, smooth the top, and bake for 25 to 30 minutes until a toothpick inserted in the center comes out clean. Cool completely in the pan before moving to the next step.
If you enjoy baking simple, crowd-pleasing treats, you might also love this eggnog bread with sweet vanilla glaze for another easy, cozy bake.
Step 2: Make the Vanilla Buttercream. Beat the softened butter in a stand mixer on medium-high speed for about 3 minutes until it turns very pale and creamy. Reduce the speed and gradually add the sifted powdered sugar, one cup at a time. Add the heavy cream, vanilla extract, and salt. Increase the speed to medium-high and beat for another 3 minutes until the frosting is light, fluffy, and smooth. If it seems too thick, add one more tablespoon of heavy cream. If it seems too thin, add a quarter cup more powdered sugar. Transfer to a piping bag fitted with a large round tip.
Step 3: Punch Out the Cake Rounds. Once the sheet cake has cooled completely, use a small round cutter or the rim of a shot glass to punch out circles from the cake. You want each round to fit snugly into your cups. Press the cutter straight down with firm, even pressure and twist slightly to release a clean circle. Gather as many rounds as you can from the pan. You'll use some scraps to fill the bottom of cups as a first layer, so nothing goes to waste.
Step 4: Layer the Dot Cakes. Place a small piece of cake scrap at the bottom of each cup to form a base layer. Pipe a thin layer of buttercream over the first layer. Add a full cake round on top of the buttercream. Pipe a generous, smooth dome of buttercream over the top, covering the entire surface of the cake round and building it slightly above the rim of the cup. Use a small offset spatula or the back of a spoon to smooth the frosting dome so it's flat and even across the top. This smooth, level surface is what holds the sprinkles in place.
Step 5: Apply the Nonpareil Dot Top. Pour the rainbow nonpareil sprinkles into a shallow bowl or flat plate. Take each assembled cup and gently press the frosted top, face down, into the sprinkles. To achieve the entirely coated dot cake effect, pour a large amount of sprinkles over a dish and then turn the dot cake upside down and lightly push it onto the plate so the sprinkles adhere to the frosting. Use your hand to gently press any gaps and make sure every bit of frosting gets covered. The goal is a complete, solid blanket of colorful dots with no frosting visible.
Step 6: Chill and Set. Place the finished dot cakes in the refrigerator for at least 30 minutes before serving. This step firms up the frosting, helps the sprinkles set in place, and makes the first-spoon moment even more satisfying. The chilled buttercream gives you that slight resistance when you run the spoon across the top, followed by the soft cake underneath.
Step 7: Serve and Enjoy. Pull the cups from the fridge and set them out for serving. Hand each person a spoon and let them dig in. The experience of scraping across the sprinkle top and cutting through the layers is half the fun, so don't rush it.
What to Serve Dot Cakes With
Dot cakes are complete little desserts on their own, but pairing them with the right things makes the whole experience even better.
For parties and gatherings, set up a small dessert table with the dot cakes as the centerpiece alongside a platter of classic cookies. Italian Christmas cookies with a soft glaze make a wonderful pairing because the mild sweetness of the cookies balances the richness of the buttercream without competing for attention.
For drinks, a cold glass of whole milk is the classic choice. The fat in the milk cuts through the sweetness of the buttercream and keeps each bite tasting fresh. Hot coffee or espresso works beautifully as well. The slight bitterness of coffee plays off the sweetness of the vanilla cake and sprinkles in a way that makes both taste better.
For a full dessert spread, consider adding a fruit element to the table. Fresh strawberries, raspberries, or a small bowl of mixed berries offer a tart, bright contrast to the richness of the cake cups. The color of the fruit also looks stunning next to the rainbow-sprinkled dot cakes on a table.
For kids' parties specifically, dot cakes pair well with a simple punch or lemonade. The visual appeal of the sprinkle tops matches the cheerful energy of the drinks and keeps the whole setup feeling festive and fun.
Top Tips for Perfecting Your Dot Cake Recipe
Getting the dot cake recipe right comes down to a few key details that make a real difference in the final result.
Use nonpareil sprinkles, not jimmies, for the top coating. Nonpareils are the tiny round ball sprinkles that give dot cakes their signature look. Jimmies are the longer rod-shaped sprinkles. The ball shape is what creates that smooth, fully coated surface that looks so satisfying in photos and videos. Jimmies don't pack together the same way and the effect isn't the same.
Make sure the cake cools completely before you cut it. Cutting into a warm cake tears the crumb and makes it impossible to get clean, defined rounds. Patience at this stage pays off in neat, attractive layers.
Soften your butter properly for both the cake and the frosting. Butter that's too cold won't cream properly. Butter that's too soft turns greasy. You want it to leave an indent when pressed but still hold its shape. About an hour at room temperature usually gets it right.
Don't skip the fridge time after assembly. The chilling step is what transforms these from "just okay" to genuinely great. The frosting firms up, the layers meld together, and the texture becomes exactly what you want: slightly firm on top, soft and fluffy inside.
Build the frosting dome above the rim of the cup. If the frosting sits level with or below the rim, the sides of the cup block the sprinkles from fully coating the edges. Piping the frosting slightly proud of the rim gives the sprinkles room to stick all the way around.
If you love baking small, beautiful desserts, these pistachio and blackberry cheesecake towers use a similar individual-portion format that you'll find just as fun to put together.
Storing and Reheating Tips
One of the best things about this dot cake recipe is how well the finished cakes hold up in storage, which makes them ideal for making ahead.
Store assembled dot cakes in the refrigerator, covered loosely with plastic wrap or sealed in an airtight container. Assembled dot cakes, sealed in jars, keep refrigerated for up to 3 to 4 days and actually get better after a few hours in the fridge once everything settles together. The flavors meld, the cake softens slightly as it absorbs a bit of the frosting's moisture, and the whole thing tastes even more cohesive the next day.
For longer storage, you can freeze the baked cake layer before assembly. You can freeze the baked cake layers without frosting for up to 2 months. Thaw overnight in the fridge, then assemble fresh before serving. This is a great strategy if you want to make a big batch of the cake ahead and then assemble fresh for a specific occasion.
Don't freeze fully assembled dot cakes. The nonpareil sprinkles absorb moisture during freezing and thawing and lose their satisfying crunch. Always add the sprinkle top after thawing and just before serving for the best texture.
For the frosting, you can make it up to three days ahead and store it in the refrigerator in an airtight container. Let it come to room temperature for about 30 minutes and then re-whip it briefly before using.
These do not need reheating. Dot cakes are served cold or at room temperature. If you prefer them at room temperature, let them sit out of the fridge for about 15 minutes before serving. The frosting softens very slightly and the cake tastes a touch sweeter when it's not fully chilled.
For a fun party alternative, you can also serve the components separately and let guests assemble their own. Set out the cake cups, piping bag of frosting, and a big bowl of nonpareils and watch people go absolutely wild with it. For more crowd-pleasing sweet treats that work beautifully at parties, these white chocolate raspberry cheesecake balls are another great option to add to the table.
FAQs
What is a dot cake made of?
Where did dot cakes originate?
What kind of sprinkles do you use for dot cakes?
Can you make dot cakes ahead of time?
How do I store leftover cake?
This dot cake recipe proves that the most talked-about dessert on social media is also one of the most fun and rewarding things you can bake at home. You don't need a plane ticket to New York, a line outside Butterfield Market, or any special equipment. You need a sheet pan, a cup, a piping bag, and a generous handful of rainbow nonpareils. The result is a cheerful, nostalgic, deeply satisfying little cake that makes everyone happy, and honestly, that's the best kind of recipe there is.
Grab your ingredients, crank up your favorite playlist, and make a batch this weekend. Tag your dot cakes on social media and share the joy. Connect with us and the community over on Facebook and Pinterest where we share new recipes every week. For more on the nutrition and health context of enjoying treats like these in a balanced way, the USDA Dietary Guidelines offer clear, reliable guidance on how sweets fit into an overall healthy diet.
Viral Dot Cake Recipe
Print recipe Save
This dot cake recipe brings the viral NYC Butterfield Market treat straight to your kitchen. Fluffy vanilla sheet cake layered into individual cups with creamy vanilla buttercream and a full coating of rainbow nonpareil sprinkles on top. Ready in under 90 minutes and perfect for parties, gifting, or a fun weekend bake.
- Prep time
- 20 minutes
- Cook time
- 30 minutes
- Total time
- 1 hour 30 minutes
- Yield
- 12 dot cakes
Ingredients
2 cups all-purpose flour 1.5 teaspoons baking powder 0.5 teaspoon baking soda 0.5 teaspoon salt 1 cup unsalted butter, softened (2 sticks) 1.5 cups granulated sugar 3 large eggs, room temperature 2 teaspoons pure vanilla extract 1 cup whole milk, room temperature 2 tablespoons rainbow jimmies (for batter) 1.5 cups unsalted butter, softened (for frosting) 4 cups powdered sugar, sifted 3 tablespoons heavy cream 1.5 teaspoons pure vanilla extract (for frosting) 1 pinch of salt (for frosting) 1.5 cups rainbow nonpareil sprinkles (for topping)Instructions
- Preheat and Prep: Preheat the oven to 350 degrees Fahrenheit. Grease and flour a 9x13 inch baking pan and line it with parchment paper.
- Mix Dry Ingredients: Whisk together the flour, baking powder, baking soda, and salt in a medium bowl. Set aside.
- Cream Butter and Sugar: Beat the softened butter and granulated sugar on medium speed for 4 to 5 minutes until pale, light, and fluffy. Add the eggs one at a time, beating after each addition, then mix in the vanilla extract.
- Combine Batter: Alternate adding the flour mixture and milk to the butter mixture on low speed, beginning and ending with flour. Fold in the rainbow jimmies by hand.
- Bake the Sheet Cake: Pour the batter into the prepared pan, smooth the top, and bake for 25 to 30 minutes until a toothpick inserted in the center comes out clean. Cool completely.
- Make the Buttercream: Beat the softened butter for 3 minutes until pale. Gradually add sifted powdered sugar, then add the heavy cream, vanilla, and salt. Beat on medium-high for 3 minutes until light and fluffy. Transfer to a piping bag.
- Punch Out Cake Rounds: Use a small round cutter or shot glass (about 2.5 inches diameter) to punch circles from the cooled sheet cake.
- Assemble the Cups: Place a cake scrap at the bottom of each cup, pipe a thin layer of buttercream, add a full cake round, then pipe a generous smooth dome of buttercream over the top, slightly above the rim.
- Apply the Dot Top: Press each frosted top face-down into a shallow bowl filled with rainbow nonpareil sprinkles. Press gently until the frosting is fully coated with a solid blanket of sprinkles.
- Chill and Serve: Refrigerate the assembled dot cakes for at least 30 minutes before serving. Serve cold with a spoon and enjoy.
Notes
For clean cake rounds, make sure the sheet cake is fully cooled before cutting. Use nonpareil sprinkles (the tiny round ball kind) for the top coating, not jimmies. The frosting dome should sit slightly above the rim of the cup so the sprinkles coat all edges. Assembled dot cakes keep in the refrigerator for up to 3 to 4 days. You can freeze the baked cake layer without frosting for up to 2 months. Thaw overnight in the fridge then assemble fresh. For variations, swap vanilla cake for chocolate, red velvet, or lemon. Cream cheese frosting or mascarpone cream also work beautifully in place of buttercream.Nutrition
- Calories
- 420
- Fat
- 22g
- Saturated fat
- 13g
- Sugar
- 48g
- Sodium
- 180mg
- Protein
- 4g
- Carbohydrates
- 54g
- Fiber
- 0.5g
Comments
Leave a comment